Top 5 Tech Inventions of All Time
1 - Electricity, which was studied for hundreds of years before being put to good use. Powers our houses and devices since the 19th century.
2 - Personal Computers. They're about 70 years old now, and their CPU power and user friendliness have increased dramatically.
3 - GPS, which was launched by the U.S. Department of Defense in 1973. It was used for military purposes in the beginning, but then a lower precision version of the system has been made available for civilians as well.
4 - The Internet as we know it took off in the 90s. Yes, it's that young!
5 - Cellular phones. The first commercially available cell phone was the DynaTAC 8000x. Sold in 1983, it had enough battery juice to last for 30 minutes of talk time, and its price was $3,995 (the equivalent of $10,000 in today's money).
From BIOS to UEFI: a guide for beginners
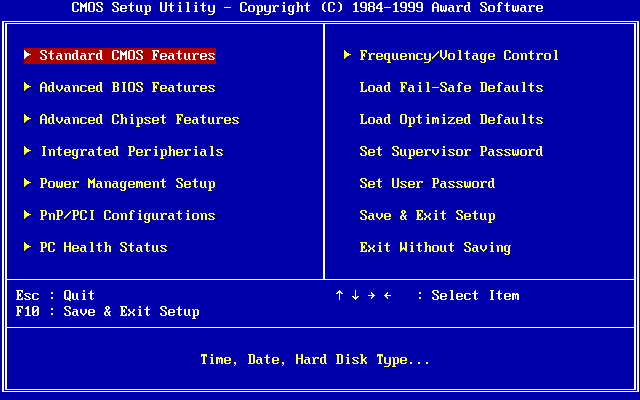
I've always been fascinated by BIOS, the acronym for "Basic Input Output System". But I've got to confess that with all those pages of complex settings (RAM timing, for example) it didn't look "basic" to me at all! It may have looked "basic" to its designers, I guess...
BIOS is the first piece of software that loads when you power up your computer. It runs some tests to verify that the key hardware components are OK, and then it tells them how to behave, preparing them to load your favorite operating system. But the BIOS is so much more than that! Read this article to see how the Basic Input Output System has evolved during the last few decades.
Blog
The successor of BIOS is UEFI, the acronym for "Unified Extensible Firmware Interface". I know, it's not a pretty name either, but UEFI has several powerful new features.
First of all, it supports hard drives that have capacities of over 2 TB. Can you believe that back in the day, when BIOS was invented, people were using 10 MB hard drives?
I can still remember the computer I bought in 1995. I paid close to $2000 for it back then, and it was incorporating a huge 540 MB hard drive. That's half a gigabyte for you, lazy math boys. Yeah, today you can store the data on about 30 hard drives that were similar with mine on a 16 GB memory stick! So, who would've thought that someday people will be able to purchase 2 TB (and larger) hard drives?
If you have got one of those giant hard drives, you can thank the UEFI inventors - they have made it possible for you to use it at its full capacity.
Another cool UEFI feature is its ability of supporting more than four drive volumes. Believe it or not, you were not allowed to use more than four drive partitions, for example. It's true that some hardware manufacturers have managed to find alternative solutions, but their hardware interfaces weren't always working as expected.
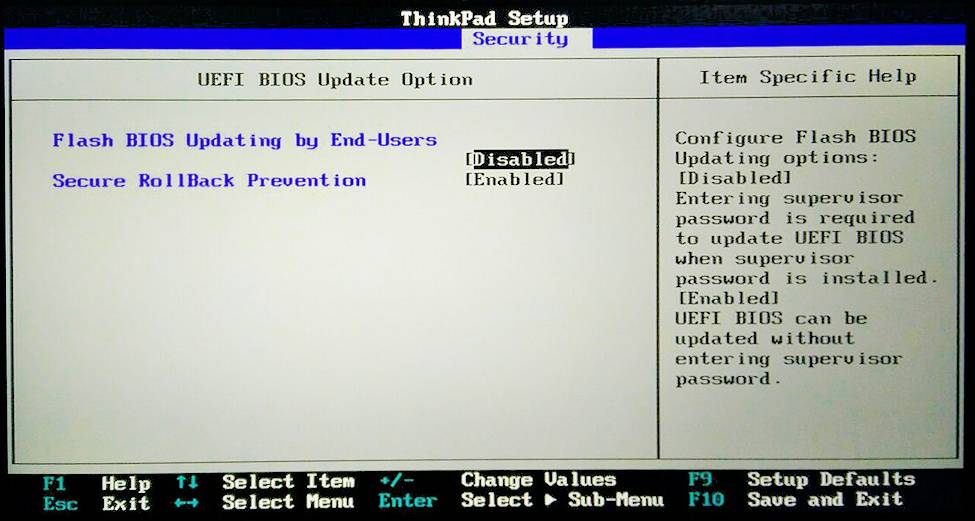
What about viruses? A few hackers have invented viruses that were rewriting the BIOS code, turning computers into useless bricks. Later on, others have invented rootkits, nasty viruses that were loading before the operating system, thus being untraceable by the installed antiviruses. Thankfully, UEFI also supports a secure boot system, which keeps the malware at bay.
First of all, it supports hard drives that have capacities of over 2 TB. Can you believe that back in the day, when BIOS was invented, people were using 10 MB hard drives?
I can still remember the computer I bought in 1995. I paid close to $2000 for it back then, and it was incorporating a huge 540 MB hard drive. That's half a gigabyte for you, lazy math boys. Yeah, today you can store the data on about 30 hard drives that were similar with mine on a 16 GB memory stick! So, who would've thought that someday people will be able to purchase 2 TB (and larger) hard drives?
If you have got one of those giant hard drives, you can thank the UEFI inventors - they have made it possible for you to use it at its full capacity.
Another cool UEFI feature is its ability of supporting more than four drive volumes. Believe it or not, you were not allowed to use more than four drive partitions, for example. It's true that some hardware manufacturers have managed to find alternative solutions, but their hardware interfaces weren't always working as expected.
What about viruses? A few hackers have invented viruses that were rewriting the BIOS code, turning computers into useless bricks. Later on, others have invented rootkits, nasty viruses that were loading before the operating system, thus being untraceable by the installed antiviruses. Thankfully, UEFI also supports a secure boot system, which keeps the malware at bay.
To access your BIOS or UEFI settings, you will need to power down your PC. Wait for a minute, press the power button, and then quickly press the key that's needed to enter the setup menu. Often times, your computer will display a message which tells you what key needs to be pressed to enter the BIOS/UEFI.
The most commonly used keys that allow you to do that are "F2", "F10", "Del" and "Esc". Your computer's manual should include this information; otherwise, you will have to visit the manufacturer's website.
Windows 10 is a modern operating system. I've already written an article that discusses some of its fantastic features, and I could have continued describing them for hours! Windows 10 also has an easy way of restarting the computer and making it boot in a special mode, which allows you to access the UEFI firmware settings.
Simply press and hold the "Shift" key, and then restart your computer using the start button, as usual. Don't release the "Shift" key until your computer reboots, though. You will then see the "Advanced Options" screen, which allows you to tweak the UEFI firmware settings.
Often times, the UEFI firmware has a graphical user interface which can be explored using the keyboard and, in some cases, even the mouse. Resist the temptation to play with the settings, though, unless you really know what you're doing. You may damage the CPU or the memory by tweaking the overclocking settings, for example. For best results, be sure to take pictures with the initial settings for all the pages where you intend to do some tweaking.
Each motherboard manufacturer has its own way of grouping the BIOS or UEFI settings. If you can't find the desired option, it is best to look it up in the computer manual or on the manufacturer's website.
Once you are done tweaking, don't forget to save the changes. Simply choose the option to exit the firmware application, and you will be greeted with several options. Pick "Save Changes" to apply the changes you've made, or "Discard Changes" to keep them as they were.
If you run into trouble, you can always access the BIOS/UEFI settings, and then load the setup defaults. This should restore all the values to the ones that are recommended by the computer maker, and hopefully fix any problems that you may have caused. It's great to have access to this option, isn't it?
Next